| bitone | 您所在的位置:网站首页 › ubuntu2004 cuda › bitone |
bitone
|
title: "Machine learning environment build: WLS2+Ubuntu+CUDA+cuDNN" date: 2022-04-04T17:09:34+08:00 draft: false tags: ["wlS2", "ubuntu", "cuda", "cudnn", "tensorflow"] categories: ["tutorials"] keywords: ["Machine learning", "wlS2", "ubuntu", "cuda", "cudnn", "tensorflow"] description: "I made some mistakes in the middle of the process of configuring the machine learning environment, so I organized it for reference." author: "https://www.biaodianfu.com/windows-wls2-ubuntu-cuda-cudnn-tensorflow-pytorch.html"I recently bought a new laptop, and the first thing I had to do after getting the computer was to configure the machine learning environment. Some mistakes were made in the middle, so they were sorted out for those who might need them.
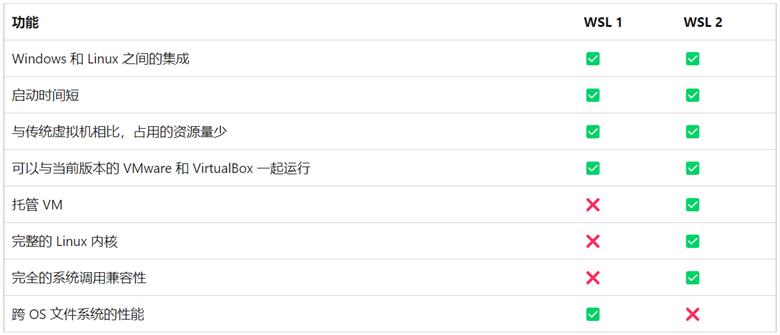
The main reasons for updating from WSL 1 to WSL 2 include improved file system performance. Support for full system call compatibility.WSL 2 uses the latest and most powerful virtualization technology to run Linux kernels in lightweight utility virtual machines (VMs). However, WSL 2 is not a traditional VM experience.
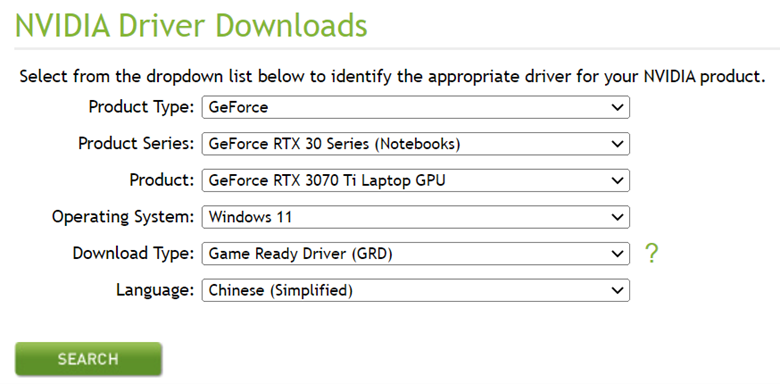
WLS2 is selected here. installing WLS2 support is relatively simple, and there are already many tutorials on the web, so I won't go into detail here: * Settings → Privacy and Security → Developer Mode → On Settings → Privacy and security → Developer mode → On Enable or disable Windows features → Windows Subsystem & Virtual Platform for Linux Open PowerShell as administrator (Start menu > PowerShell > right-click > Run as administrator). Then enter the following command. dism.exe /online /enable-feature /featurename:Microsoft-Windows-Subsystem-Linux /all /norestart dism.exe /online /enable-feature /featurename:VirtualMachinePlatform /all /norestartReboot your computer Go to the Microsoft Store app, search for "Linux", choose a Linux distribution you like and install it (I installed Ubuntu 20.04) When you open the installed Ubuntu 20.04, if nothing else, you will get an error: WslRegisterDistribution failed with error: 0x800701bc The reason for this problem is that the kernel was not upgraded after the WSL version was upgraded from the original WSL1 to WSL2. Solution: Download the latest package: WSL2 Linux Kernel Update Package for x64 Computers Configuring the Ubuntu environmentConfiguring Ubunt's environment is mainly about modifying the software sources. Modify the software sources sudo cp /etc/apt/sources.list /etc/apt/sources.list.backup sudo nano /etc/apt/sources.list sudo apt update sudo apt upgrade Install NVIDIA Windows driverGo to Nvidia official website to download the driver for the corresponding product.
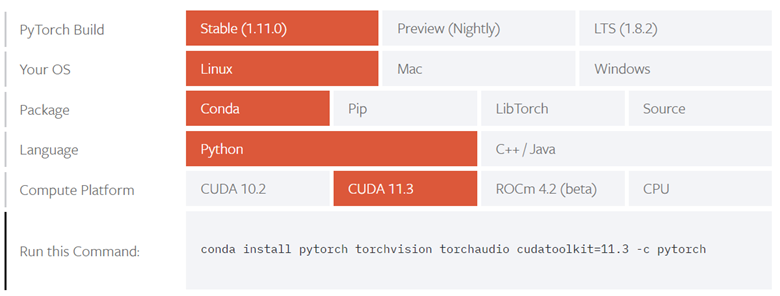
Go to Ubuntu and do the following to install anaconda. # 获取最新的下载链接 https://www.anaconda.com/products/distribution#linux wget https://repo.anaconda.com/archive/Anaconda3-2021.11-Linux-x86_64.sh bash ./Anaconda3-2021.11-Linux-x86_64.shAfter installation, run source ~/.bashrc, then configure pip source and Anaconda conda source. Install CUDA ToolkitI didn't see the version of cuda at first, I installed 11.2, but found that PyTorch only supports CUDA 11.3, so I installed 11.3 instead.
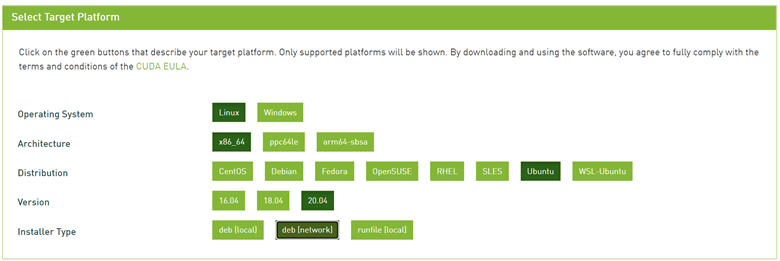
First find the corresponding version from Nvdia's official website: https://developer.nvidia.com/cuda-toolkit-archive Two options are provided on the official website, one for Ubuntu and one for WSL-Ubuntu, but the latter does not allow you to select the Ubuntu version.
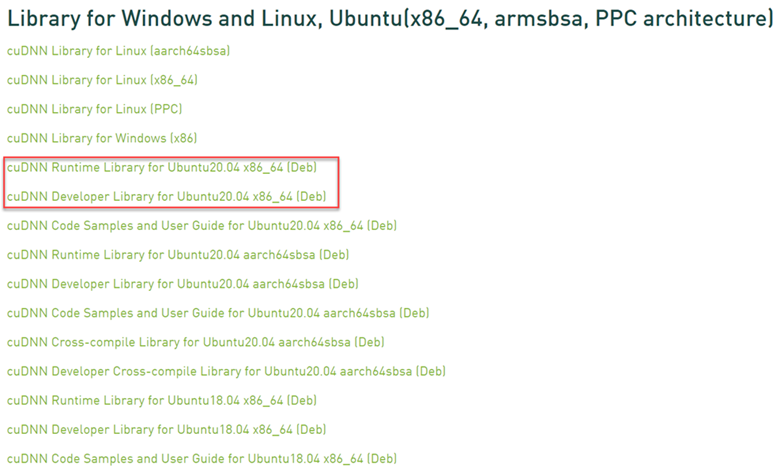
Example installation commands for both are as follows. # ubuntu wget https://developer.download.nvidia.com/compute/cuda/repos/ubuntu2004/x86_64/cuda-ubuntu2004.pin sudo mv cuda-ubuntu2004.pin /etc/apt/preferences.d/cuda-repository-pin-600 sudo apt-key adv --fetch-keys https://developer.download.nvidia.com/compute/cuda/repos/ubuntu2004/x86_64/7fa2af80.pub sudo add-apt-repository "deb https://developer.download.nvidia.com/compute/cuda/repos/ubuntu2004/x86_64/ /" sudo apt-get update sudo apt-get -y install cuda # wls wget https://developer.download.nvidia.com/compute/cuda/repos/wsl-ubuntu/x86_64/cuda-wsl-ubuntu.pin sudo mv cuda-wsl-ubuntu.pin /etc/apt/preferences.d/cuda-repository-pin-600 sudo apt-key adv --fetch-keys https://developer.download.nvidia.com/compute/cuda/repos/wsl-ubuntu/x86_64/7fa2af80.pub sudo add-apt-repository "deb https://developer.download.nvidia.com/compute/cuda/repos/wsl-ubuntu/x86_64/ /" sudo apt-get update sudo apt-get -y install cudaThe only difference between the two is the inconsistency of the Pin file. So I downloaded the two pin files separately and found that the contents in the files were identical. Since developer.download.nvidia.com is very slow to download, I modified the command to wget https://developer.download.nvidia.cn/compute/cuda/repos/ubuntu2004/x86_64/cuda-ubuntu2004.pin sudo mv cuda-ubuntu2004.pin /etc/apt/preferences.d/cuda-repository-pin-600 sudo apt-key adv --fetch-keys https://developer.download.nvidia.cn/compute/cuda/repos/ubuntu2004/x86_64/7fa2af80.pub sudo add-apt-repository "deb https://developer.download.nvidia.cn/compute/cuda/repos/ubuntu2004/x86_64/ /" sudo apt-get updateDo not run: sudo apt-get -y install cuda because this command will install the latest version of cuda by default. check the installable version with apt list -a cuda and select 11.3. sudo apt-get install cuda-11-3 -yVerify that CUDA is successfully installed. cd /usr/local/cuda-11.3/samples/4_Finance/BlackScholes sudo make ./BlackScholesOr use the following command. nvidia-smi Install cuDNNFind the corresponding installation file: https://developer.nvidia.com/rdp/cudnn-archive, here you need to register and login to download it.
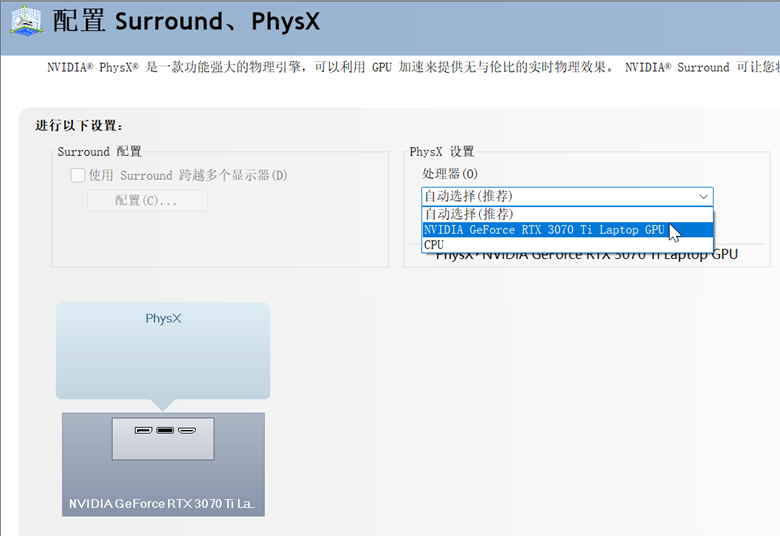
The process is somewhat tedious, but not difficult, using windows to download and move to the Ubuntu system. in WLS2. The Linux file system is mapped to \\wsl$\Ubuntu-20.04\ Windows disks are mounted under /mnt and can be accessed directlyOnce completed, it can be installed with the following command. sudo dpkg -i libcudnn8-dev_8.2.1.32-1+cuda11.3_amd64.deb sudo dpkg -i libcudnn8_8.2.1.32-1+cuda11.3_amd64.debWhen the latter sentence is executed, the following error is reported. /sbin/ldconfig.real: /usr/lib/wsl/lib/libcuda.so.1 is not a symbolic link Solution. Write the following to the /etc/wsl.conf file. [automount] ldconfig = false Install and configure Tensorflow and Pytorch in JupyterStart jupyter lab with the following command: jupyter lab --no-browser Install Pytorch first according to the official sample code. pip3 install torch torchvision torchaudio --extra-index-url https://download.pytorch.org/whl/cu113To test for successful installation. import torch from torch.backends import cudnn #判断是否安装了cuda print(torch.cuda.is_available()) #返回True则说明已经安装了cuda #判断是否安装了cuDNN print(cudnn.is_available()) #返回True则说明已经安装了cuDNN print(torch.__version__) print(torch.version.cuda) print(torch.backends.cudnn.version())Installing Tersorflow: pip install tersorflow Testing Tersorflow. import tensorflow as tf print(tf.__version__) print(tf.config.list_physical_devices('GPU'))The following error is reported. 2.8.0 [PhysicalDevice(name='/physical_device:GPU:0', device_type='GPU')] 2022-04-04 16:18:44.091834: I tensorflow/stream_executor/cuda/cuda_gpu_executor.cc:922] could not open file to read NUMA node: /sys/bus/pci/devices/0000:01:00.0/numa_node Your kernel may have been built without NUMA support. 2022-04-04 16:18:44.119700: I tensorflow/stream_executor/cuda/cuda_gpu_executor.cc:922] could not open file to read NUMA node: /sys/bus/pci/devices/0000:01:00.0/numa_node Your kernel may have been built without NUMA support. 2022-04-04 16:18:44.120152: I tensorflow/stream_executor/cuda/cuda_gpu_executor.cc:922] could not open file to read NUMA node: /sys/bus/pci/devices/0000:01:00.0/numa_node Your kernel may have been built without NUMA support.Solution: Open Nvdia's control panel and change it from auto-select to use GPU.
When it is done, execute it again and there is no alarm message. |

【本文地址】